Before using the Essential web software, take time to properly identify and organize all relevant resources that will be entered into the database. The General Work Flow for your module(s), the Quick Start, and the Working with Validation Tables topics are essential reading for proper organization and should be reviewed and understood before you proceed with data entry.
When you open the Essential software, the Navigation Tree appears in the window's left pane, as shown in the image below. form contents are displayed in the right pane when a form is opened. A form is a window for entering, viewing, and editing information in the Essential database.
The Navigation Tree contains the links to all of your Essential modules (Air, Water, Compliance Manager, etc.). The modules are organized in the following functional categories:
Environmental
Air
Chemical Inventory
FEMS
Waste
Water
Health & Safety
Incident
Industrial Hygiene
MSDS Manager
Crisis
Emergency
Performance
Audit
Compliance Manager
Performance Manager
Task Manager
Interoperability
Process Data Manager
Work Order Manager
Each module is represented by a folder with a unique icon. Click the folder's plus sign to open it. Typically, you will find three common folders for each module, Data Entry, Reports, and Tools. Within each common folder are subfolders that further organize the module's forms into groupings based on the type of information they store. For example, all entity-related forms are in a subfolder called Essential Hierarchy. Open the folders to locate appropriate forms and click a form link to access the form.
![]() Note:
The actual folders, subfolders, and form links displayed in the
Navigation Tree are organized alphabetically and are based on your user
security settings.
Note:
The actual folders, subfolders, and form links displayed in the
Navigation Tree are organized alphabetically and are based on your user
security settings.
Navigation Tree |
|
form Display Panel |
|
|
|

In online help for the Essential application, navigational paths are identified beginning with the name of one of the common module folders (Data Entry, Reports, Tools) followed by a greater-than sign, followed by the next folder name and a greater-than sign, etc., and ending with the form name. For example, the navigational path to access the Enterprise Entity form would be identified in a procedure as: Click Data Entry > Essential Hierarchy > Enterprise Entities in the Navigation Tree.
![]() Tip:
For the Essential Emergency module, a shortcut menu form is available
when you click the module folder name. Use the links on the shortcut menu
form or in the Navigation Tree to access Emergency module forms. All procedures
in online help provide the navigational path when identifying access methods.
Tip:
For the Essential Emergency module, a shortcut menu form is available
when you click the module folder name. Use the links on the shortcut menu
form or in the Navigation Tree to access Emergency module forms. All procedures
in online help provide the navigational path when identifying access methods.
![]() Note:
The actual fields and sections displayed on Essential forms are
based on the modules that are part of your implementation and your user
security settings.
Note:
The actual fields and sections displayed on Essential forms are
based on the modules that are part of your implementation and your user
security settings.
The Data Entry view in Essential is a form for entering data and viewing an existing record. Related information is grouped into sections for easy reference. Two options are available for viewing the sections on a form. The Tab view is the default and is displayed in the image below.

The header section appears at the top of the view. When a form contains multiple sections, the sections are arranged in one or more rows of tabs below the header section. Click a tab to display the corresponding section.
![]() Note:
Subsections are not tabbed. In addition, other form constraints
may result in a section not being displayed in a tabbed format.
Note:
Subsections are not tabbed. In addition, other form constraints
may result in a section not being displayed in a tabbed format.
The other option is to view sections arranged sequentially, as displayed in the image below. (Features of a Data Entry view are also identified in the image.) Use the scroll bar to view different sections.
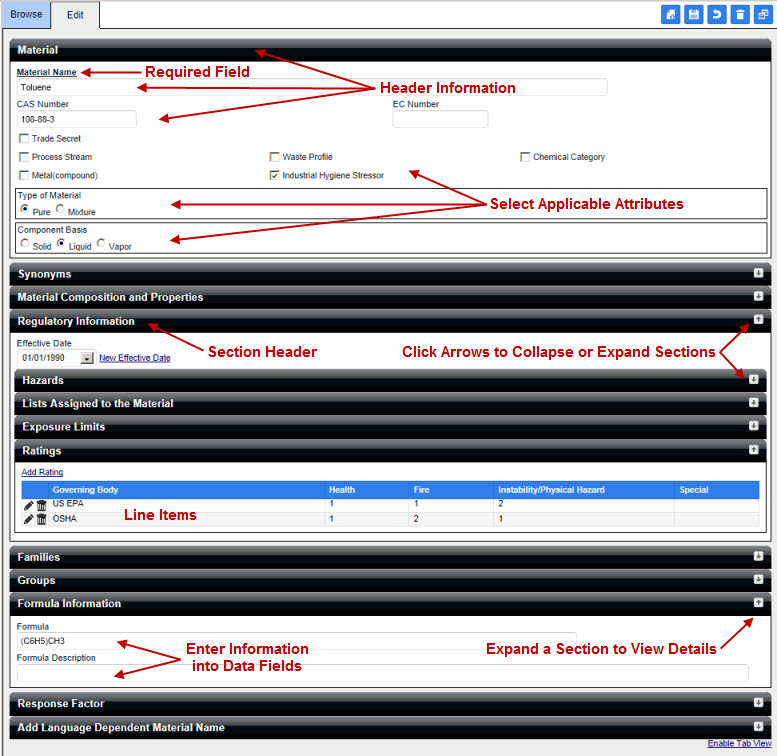
Regardless of the default view, when a form can be viewed in a tabbed format, a link is available at the bottom of the form to enable/disable the Tab view for that form only. Before switching between views, save any edits first. Otherwise, all changes will be lost. Refer to Setting User Preferences to specify your preferred Data Entry view.
![]() Note:
All instructions and procedures in web help assume full access has
been granted and the Data Entry view with the sections arranged sequentially
is being used.
Note:
All instructions and procedures in web help assume full access has
been granted and the Data Entry view with the sections arranged sequentially
is being used.
All data for Essential records is entered via the Data Entry view. This view contains a header section at the top and one or more sections below it. The header section stays static; it is not tabbed and does not expand or close. Generally, the information located in the header area identifies the unique record.
Each section contains a variety of data fields that collect the attributes related to the record. Some sections include subsections with expansion arrows to expand or close the subsections.
For the Tab view, expansion arrows do not apply to sections. Click a tab to display the corresponding section. Since subsections are not tabbed, expansion arrows apply when working with subsections.
![]() Tip: When a record is saved in the Data Entry view, the state
of the sections (e.g., expanded or closed) is also saved. The next time
you open the form in the Data Entry view, the sections are displayed in
the same expanded/closed state. For the Tab view, the section that is
selected when the record is saved is the section that is displayed the
next time you open the form.
Tip: When a record is saved in the Data Entry view, the state
of the sections (e.g., expanded or closed) is also saved. The next time
you open the form in the Data Entry view, the sections are displayed in
the same expanded/closed state. For the Tab view, the section that is
selected when the record is saved is the section that is displayed the
next time you open the form.
Each section heading identifies secondary information for the record, e.g., material regulatory information. Expand the section headings to find additional subordinate headings. When using the Tab view, the section heading is the tab label. Click a tab to display the corresponding section.
Use the arrows located in the upper right corner of the section/subsection headings to expand or close each section as needed.
The Essential web software is not case-sensitive, i.e., UPPERCASE and lowercase entries are accepted.

Buttons with commands that are available are displayed with a blue background; buttons with unavailable commands are not. The New Applicability, Export to Excel, and Browse Records buttons are available in the example above.
Many data fields provide a list of valid entries from which a selection is made for the field. Begin typing the value to select the correct entry or click the field's arrow button to view the entire list and make a selection. If the required entry is not listed, click the Ellipsis button (...) next to the field. The appropriate form is displayed so you can establish the new value for the list and then select it for the field. Due to security settings, the Ellipsis button is available only when you have access to the form used to establish values for the list.
For some fields, a Lookup
tool  is provided to select a valid entry. Typically,
the Lookup tool is displayed when the list of valid entries is extensive.
Often, a Browse view with a
Search feature and a New
button are included to help you quickly locate the correct value or establish
a new one.
is provided to select a valid entry. Typically,
the Lookup tool is displayed when the list of valid entries is extensive.
Often, a Browse view with a
Search feature and a New
button are included to help you quickly locate the correct value or establish
a new one.
![]()
The Show Record Details icon provides details about current record you are working with or details about a specific record that has been selected for a data entry field. For example, when a person is selected for a contact-related field, the address, title, phone number, and title details from the contacts and personnel record are displayed. The icon appears next to applicable fields; move the mouse over the icon to view details.
Some forms contain line items for data entry. Adjacent to each line item are action buttons, e.g., Save, Edit, Delete, etc., that apply to the individual line item. If a Save button is displayed, click it to save the data entered for a new line item. When the line item has been successfully saved, an Edit button is displayed. All line items with a Save button must be saved before you click the Save button at the top of the form; otherwise, the data entered will be lost.
Where available, use the up/down arrows at the end of a line item to change the order of the list of line items.
The labels for data fields that require entries appear bold and underlined, e.g., Entity Name, Material, etc. If a data field that requires an entry has not been completed when you click Save, an error message is displayed. The row with the field that requires an entry is marked with a red asterisk for identification purposes. Simply enter the required information and click Save.
![]() Note:
When an entry in more than one field can satisfy a data requirement,
e.g., a Task Owner OR a Task Team
must be specified on the Task Setup and Results form, field labels are
not displayed in bold. However, the same notification method, i.e., error
messages, is used for incomplete data.
Note:
When an entry in more than one field can satisfy a data requirement,
e.g., a Task Owner OR a Task Team
must be specified on the Task Setup and Results form, field labels are
not displayed in bold. However, the same notification method, i.e., error
messages, is used for incomplete data.
If a data field contains an invalid entry when you click Save, an error message is displayed. The row with the field that contains an invalid entry is marked with a red asterisk for identification purposes. Simply enter the correct information and click Save.
Some forms allow an optional entity association so the record is available only to users with access to the entity. Other forms allow entities to be added for historical or recordkeeping purposes, such as a hospital for an injury record. This association can be removed by selecting the entity, pressing the Tab key to delete it from the field, and then saving the record.

Information for new records is entered in the Data Entry view. To start a new record, click the New button in the Data Entry view or the Browse view. (If you click New in the Browse view, the Data Entry view is automatically displayed.) All data entry fields are cleared so new information can be entered.

When all data is entered, click the Save button on the form to save the record. New entries may appear in a different font color (e.g., red) signaling the record needs to be saved. If you entered information in fields for a line item with a Save button, click the Save button adjacent to the line item before clicking the Save button for the form.
When a Save button is displayed adjacent to a line item, click it to save the information entered. Once the data has been saved, the Save button is replaced by an Edit button. In some cases, a blank row appears below the saved line item so you can enter information for another line item. Otherwise, a button or link that opens another form in a separate window is available. All line items must be saved before you click the Save button on the form.

Click the Cancel button on the Data Entry view for a new record to stop the record creation process. Where applicable, the Browse view is displayed.
![]()
To discard changes for an existing record and return the record to the state it was in before modifications were made, click the Cancel button. None of the changes will be saved.

Remove unwanted records via the Data Entry view. Click the Delete button on the form to delete the record. If the record cannot be deleted, it is being used in another part of the database. All instances of the record must be removed from the various parts of the database before it can be deleted.
Records are modified in the Data Entry view. To modify a record, first locate the record using the Browse view and click the record link. For information on finding records, see Locating Records. When the record is open in the Data Entry view, complete your edits. Click the Save button to save changes after modifications have been made.

Copying a record creates another record in the database with the same information in the data fields. To duplicate a record, open the record to be copied in the Data Entry view and click the Copy button. The new record is displayed and can be edited as necessary.

Click the Edit button adjacent to a line item to change the information entered for the line item. In some cases, changes can be made and saved via the line item. The Edit button is replaced by a Save button. Otherwise, another form is displayed in a separate window where changes can be made. A Save/OK button is available for saving your edits.

Click the Delete button adjacent to a line item to remove the line item from the record when the record is saved.
![]()
On some forms, more than one record can be selected at one time and all selections may not be confined to one page in multiple page lists. Click the Show Selected Records icon to display just the records chosen so far. Click the icon again to return to the view that shows all the records available for selection.

forms where a Browse view and a Data Entry view are available for a record typically contain a navigation bar. Use the Browse and Edit tabs to switch between the views. Click the Browse tab on the Data Entry view and the same Browse page where the record was selected is displayed again. Click the Edit tab on the Browse view to return to the Data Entry view for the selected record.
The navigation bar also provides access to the Change
Log.  And, for existing records,
the field used to enter a Reason for
Change may be displayed in the navigation bar.
And, for existing records,
the field used to enter a Reason for
Change may be displayed in the navigation bar.
A Globe icon or Map button displayed on a form provides access to the Global Viewer. View a map of the location based on the street address entered. (A map will not be generated when latitude/longitude coordinates are specified in place of a street address.) This mapping feature supports North American addresses only.

